Building birdhouses is a calm and enjoyable activity that looks fantastic in the garden and gives the birds a place to live and rear their young. Birdhouses are simple to construct and don’t take much time or expensive tools. They are just small six-sided boxes.
They are also excellent projects using scrap wood, salvaged timber, or low-cost pine from a home improvement store. When choosing a location for their nest, birds may be quite picky. They won’t move in if the birdhouse doesn’t suit their precise requirements. Each birdhouse listed below has provided refuge to several broods of young birds.
Three Units of The Birdhouse
This unique birdhouse comprises three smaller wooden birdhouses. Each construct separately and then join together to create the multi-unit condo. Simple pine boxes with six sides make up each of the little birdhouses, yet they are all slightly varied sizes to fit neatly into the condo layout.

The three wooden birdhouses have a staggered appearance when piled together due to the varying sizes of the birdhouses. The trio of birdhouses intended for tiny cavity-nesting birds like wrens and chickadees. The birdhouse condo attached to a tree, pole, or small structure. It can also suspended from a tree branch or a mounting bracket by using an eye hook.
The Little Hanging Birdhouse
This tiny birdhouse is rather basic but has a few modifications that turn it from a plain hanging box into a lovely and useful piece of garden decor. To begin with, the front panel constructed from laminated strips of mahogany, walnut, cherry, and maple.
Danish oil accentuates the wood’s grain patterns and contrasting hues. Pine used to construct the rest of the birdhouse. The remaining outside surfaces sand and paint grey, while the roof stains in ebony black. For the protection of the baby birds, the exterior has stain; the interior has left untreated.
Hanging Birdhouse
I’ve created several hanging birdhouses, and most of the time, the box hangs from eye bolts that are fastened to the roof. This generates a point of failure where the roof eventually tends to separate from the body of the box. After hanging outside in the weather and swinging in the breeze.
This issue is fixed easily by drilling tiny holes in the front and rear panels towards the top of the roof. And then threading a cable or wire through the holes. Under the roof, some openings improve ventilation and aid in maintaining a cool interior. Creating simple internal access is another improvement. One of the sides hinged, making it easy to clean the inside and tie off the cable for hanging the birdhouse.
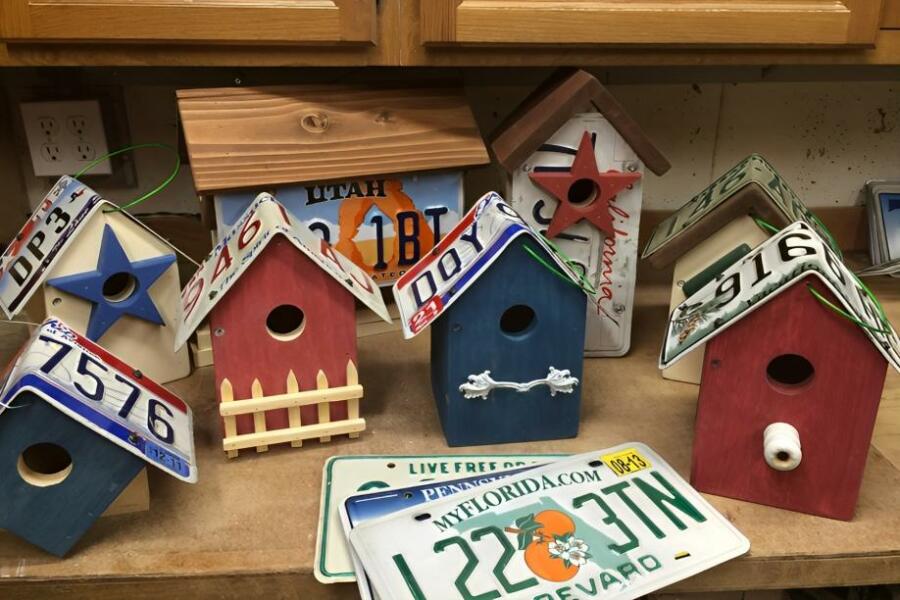
Licence Plate Birdhouse

The construction of this tiny birdhouse follows the same steps as those described above, but with a few modifications. The wood roof swapped out for a licence plate, and the front portion is made from a plain piece of pine rather than a laminated one. Enough wood was available for the birdhouse from an external cedar trim board saved from a remodelling project.
Slats for the roof were cut from a thin shipping pallet. Although it might necessitate some effort and work to transform an old board into useful lumber, finding salvaged wood is not too difficult. It is necessary to clean the old wood, take out the metal nails and screws, and cut away any split or broken pieces.
Variation of A Theme
Any salvaged wood should clean with a firm bristle brush to get rid of any dirt or loose paint, and then it should be allowed to dry indoors for a few days to get rid of any moisture. Most salvaged wood has already lost its natural dampness, but some pieces may still be damp from exposure to snow or rain. Check the recovered wood for nails, screws, or other foreign things that might splinter or harm cutting edges.
A metal detector makes finding and removing steel and iron fragments much easier. Cut away any split or broken lumber after marking the useful pieces. This hanging wooden birdhouse may constructed using simple hand tools and woodworking abilities, and recycling old wood can help cut costs and prevent valuable material from going to waste.
Some Assembly is Necessary
Start the construction of the birdhouses by joining the two side pieces with weatherproof nails or screws, carefully aligning grooves. Trim the Plexiglas panel as necessary to fit tightly into the groove before sliding it into the two side pieces. Attach the final two sides as shown in the picture, carefully arranging the side pieces to create a square.
Enclose the translucent plastic panel by attaching the side pieces with nails or screws. Mark the front portion and the entry guard, then drill a 1″ hole through them. After positioning the front section, use screws or nails to secure it to the sides. As seen in the photo, bias-attach the entrance guard to create a diamond-shaped shape. Put the two roof pieces together.
Two galvanised eye bolts screwed into the roof peak about an inch from each end will used to hang the finished birdhouse. To hang the birdhouse from a tree or pole, use a brief section of copper electrical wire that has recovered and stripped.
Making Birdhouses from Recycled Wood

Several woodworkers and hobbyists are searching for substitute sources of wood. For their do-it-yourself waste wood projects as timber prices continue to climb. Finding salvaged wood is quite simple once you start looking. But it might take some time and work to transform an old board into a useful piece of lumber.
The old stack of pallets could make for decent material but use caution. Don’t spend your time with greasy, soiled, or unclean piece. Since pallets are full of nails that are hard to remove and require effort to break apart. It is necessary to clean the old wood, take out the metal nails and screws, and cut away any split or broken pieces.
While not all projects call for salvaged timber, utilising recycled wood may help you stretch your woodworking budget. It prevents excellent wood from going to waste, and creates intriguing birdhouses thanks to the aged wood’s character.
Also read: How To Get Rid of Chipmunks Around House?


