


I know how to take screenshots on PC are necessary to your day-to-day life. Besides, it could be your darling neckpiece or could be a piece of information or a goofy late-night gossip even could be serious evidence. Without any doubt, a screenshot works like a one-man army.
Talking from a professional view to educational view screenshots have been taken in almost every room. Plus, the screenshot let you capture precisely what you see on the screen of your computer. You must wonder sometimes how to do it. And, that is why today we will talk about how to screenshot on a PC!
There are so many different ways to screenshot on a PC. Plus, it may be at any length. Also, there are third-party apps where you can take screenshots manually.
So, in this following article, we have tried to disclose how to screenshots on Windows 10 and 11. Let’s learn with us.
Methods of Screenshots on Windows 10
There are several methods that you can process with. Let’s get away with learning how to take screenshots on PC.
To capture full or minimized screenshots we will head with the following method.
1. Alt+ Prt Sc (print screen)
2. Prt Sc(print screen)
3. Using a third-party app
1. How to Take Screenshots Using Alt + Prt Sc
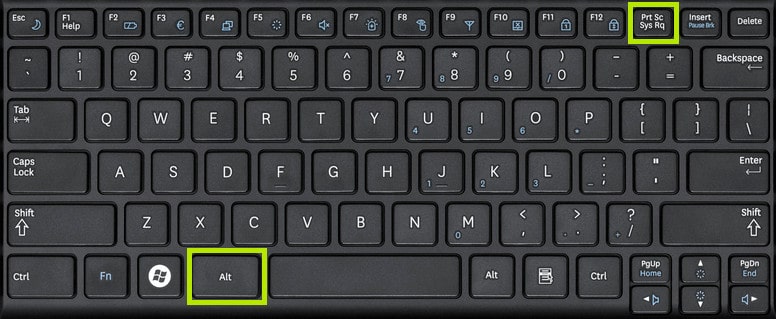
1. Try using Alt + Prt Sc keys to capture a single screen. Click on the window or image you want to capture.
2. Press Alt and hold on then press Prt Sc. The image of your window will be copied to your clipboard. However one thing this only works for your active screen. That means the other windows won’t be in progress.
3. Now to save the copy
Hold on to the windows key and then tap the Prt Sc. Now your image is saved as a file.
4. Now you can locate your saved image on screenshot files. It follows: users>Users Name>Pictures>Screenshots
2. How to take Screenshots Using the Print Screen key

The easiest way to take screenshots on windows is most likely with a print screen.
1. Locate the print screen key. It should be at the top of the keyboard on the first row on the right following the insert key. Yes, it’s your Prt Sc key.
2. Then, open the windows or image you want to take a screenshot of. Click the Prt Sc key on your keyboard. It will automatically copy your image to the clipboard.
3. To save the image as a file using this programs such as Microsoft office or paint. Insert copied image into one of these programs. Now save it as a file.
4. The screenshot will be uploaded to your screenshot folder. Following The Users>pictures> Screenshots
3. Using Third-party Apps
If you are having problems while working on the keyboard. Also if the listed methods on windows 10 do not provide you with any help. It’s time for a third-party app. Third-party apps have installed tools for screens. It works manually. Can capture full or minimized screen. Easy to access.
The third-party comprises various integrations like image editing, storage management, sharing, and efficient, and productive tools. Some of the third-party apps are –
- ShareX: Free of charge. Open source and can take screenshots in various ways. Also, have an automatic screenshot setting. You can link with cloud storage easily.
- Green Shot: Used for internet explorers. Easy to take snips. Captures full web pages no matter what. Also is accompanied by basic screenshot functions.
- Windows Snipping Tool: Provides free screenshot tools. It has basic screenshot tools as well as manual and productive ones. One of its coolest features is it can draw a custom snip of your image before taking a screenshot.
How to take Screenshots on Windows 11
Now you know that there is more than one way how to take screenshots on PC. Let’s grab with us the bests for your Windows 11. Like Windows 10 we will share with you the most useful and best methods. The methods of screenshots for Windows 11 are as follows :
•PrtSc key
• Using Snipping Tool
• Snip And Sketch Tool
1. How to Take Screenshots Using the PrtSc+Windows Key key on Windows 11
1. Open the screen or window that you want to screenshot. Make sure the screen is on the up without any distractions.
2. Find the Prt key on your keyboard it should on the upper row right next to F12.
3. Press the Prt Sc key and windows key at the same time. The screen is dimmed most likely. The screenshot has been copied to your clipboard.
4. Find the screenshot on the screenshot folder
2. Using Snipping Tool to take Screenshot on Windows 11

1. Type the snipping tool in the search bar. It is mainly available in Windows 11.
2. Click on new to choose various screenshots. Mainly there are four screenshots.
3. Choose one of them and set them as delayed. Delay it for 5-10 seconds. That’s how you will get time to adjust your windows or image.
4. To take the screenshot simply hit the windows+shift+S. It will copy the image to your clipboard.
3. Using Snip and Sketch Tool to Take Screenshots on Windows 11
No more wondering how to take screenshots on PC. This is the easiest.
1. Windows 11 lets you take a partial screenshot using the snip and sketch tool. Click Windows+ Shift + S. A small menu will show up.
2. Screen will ask you to choose one among freeform, rectangular, full screen, and windows.
3. Take your screenshot as required. It will save to your clipboard. Paste it if you want to save as a file or insert it into programs.
4. Also you can edit your screenshots.
Is there any chance you want to know more about how to take screenshots on PC? I bet it’s more than enough.
Conclusion
Taking screenshots is one of the most important and best things that has ever happened to mankind. And, apparently, different devices offer different ways of taking a SS without any problem. So, now that you know how to take screenshots on PC, make sure you also learn on how to record your screen as well!
Also read: 8 Best Snipping Tools for Mac


